
If you have been looking to automate the export of BoM’s from Inventor to Excel, or CSV, you’ve come to the right place. I’ve adapted the Inventor API sample to work with iLogic, and added a few tweaks to give the user some input around the export.
When the iLogic code is run, it checks to make sure that the file is an Assembly. The user is then asked to specify a BoM format.

The iLogic Code will export the chosen type, based on on of the 3 options:
- Structured – All Levels
- Structured – Single Level
- Parts Only
If no selection is made, the code exits. If a selection is made, the corresponding BoM type is exported and saved to the same location as the Assembly file, with the same name (.xls).
Here is an animated GIF showing how the code works:

Here is the iLogic code which automatically exports the BoM to Excel:
'Adapted from Inventor API Samples by Clint Brown @ClintBrown3D
'iLogic code Originally posted at https://clintbrown.co.uk/bom-export-with-ilogic

oDoc = ThisDoc.ModelDocument
'Ensure that we are in an Assembly file - Exit if not
If oDoc.DocumentType = kPartDocumentObject Then
	MessageBox.Show("You need to be in an Assembly to Export a BOM", "@ClintBrown3D iLogic")
	Return
End If
oDoc = ThisApplication.ActiveDocument
Dim oBOM As BOM
oBOM = oDoc.ComponentDefinition.BOM

'**************************************************************************************
'You can change the output path by editing CSVpath below - by default the path is the same as the assembly file
'CSVpath = ("C:\Inventor\") 'If you change the path, remember to keep a \ at the end
CSVpath = ThisDoc.Path + "\"
'**************************************************************************************

'Get user input for Export Type:
Dim MyArrayList As New ArrayList
MyArrayList.Add("")
MyArrayList.Add("Structured - All Levels")
MyArrayList.Add("")
MyArrayList.Add("Structured - Single Level")
MyArrayList.Add("")
MyArrayList.Add("Parts Only - (Shows components in a flat list)")

ClintsBoMExporter = InputListBox("Choose a BoM type to Export: " & ClintBrown3D , MyArrayList, d0, Title := "@ClintBrown3D: BoM Export ", ListName := "BoM Type")

If ClintsBoMExporter = "Structured - All Levels" Then :GoTo GoAllLevelsExport : End If
If ClintsBoMExporter = "Structured - Single Level" Then :GoTo GoSingleLevelsExport : End If
If ClintsBoMExporter = "Parts Only - (Shows components in a flat list)" Then : GoTo GoPartExport : End If
If ClintsBoMExporter = "" Then : Return : End If

'STRUCTURED BoM ALL LEVELS:
GoAllLevelsExport:
' the structured view to 'all levels'
	oBOM.StructuredViewFirstLevelOnly = False
' Make sure that the structured view is enabled.
	oBOM.StructuredViewEnabled = True
	Dim oStructuredBOMView As BOMView
	oStructuredBOMView = oBOM.BOMViews.Item("Structured")
' Export the BOM view to an Excel file
	oStructuredBOMView.Export(CSVpath + ThisDoc.FileName(False) + ".xls", kMicrosoftExcelFormat)
GoTo GoLaunch:

'STRUCTURED BoM Single Level
GoSingleLevelsExport:
	oBOM.StructuredViewFirstLevelOnly = True
	oBOM.StructuredViewEnabled = True
	oStructuredBOMView = oBOM.BOMViews.Item("Structured")
	oStructuredBOMView.Export(CSVpath + ThisDoc.FileName(False) + ".xls", kMicrosoftExcelFormat)
GoTo GoLaunch:

'PARTS ONLY BoM
GoPartExport:
	oBOM.PartsOnlyViewEnabled = True
	Dim oPartsOnlyBOMView As BOMView
	oPartsOnlyBOMView = oBOM.BOMViews.Item("Parts Only")
	oPartsOnlyBOMView.Export (CSVpath + ThisDoc.FileName(False) + ".xls", kMicrosoftExcelFormat)
GoTo GoLaunch:

'Get user input - do you want to see the BoM?
GoLaunch:
	i = MessageBox.Show("Preview the BOM?", "@ClintBrown3D iLogic", MessageBoxButtons.YesNo)
	If i = vbYes Then : launchviewer = 1 : Else : launchviewer = 0 : End If
	If launchviewer = 1 Then ThisDoc.Launch(CSVpath + ThisDoc.FileName(False) + ".xls")
By Default the iLogic routine is set up to save the BoM to the same path as the original Assembly file, however you can change this by editing the “CSVpath” value (shown below).
I have set up “C:\Inventor\” as an example (this is commented out in the code), but it could be set to a specific location on a server for example.
'**************************************************************************************
'You can change the output path by editing CSVpath below
'CSVpath = ("C:\Inventor\") 'If you change the path, remember to keep a \ at the end
CSVpath = ThisDoc.Path + "\"
'**************************************************************************************
Notes:
This version of the code was briefly tested with Inventor 2020. It should work on other versions. Note that you cannot export thumbnails to Excel with earlier versions, this functionality was introduced in the 2018.1 release.
Please note that I cannot offer any additional support, this blog post is offered as-is, and is aimed at the more advanced user.
As always, please test all iLogic code extensively on non-production files. Do not use any code in a production environment until YOU have thoroughly tested it and have verified that it works as expected. Always back up any data before running any experimental code. You are ultimately responsible for any iLogic code that you run, so make sure that you test it thoroughly!
Other:
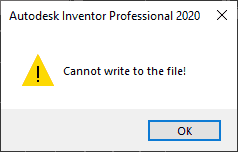
If you come across this error, it is because you currently have the Excel file opened.
A question that is sure to come up is; “How do I customise the BoM rows or include specific information on my BoM?” Here is a video I recorded some time back for Cadline Community which explains the process.

You must be logged in to post a comment.