
With the release of Advanced Print controls in November 2022, printing to scale in Fusion 360 is now a lot easier. The new print dialogue pulls the list of available printers from your operating system, and the paper sizes come from your printer. Scale can be specified using a ratio, e.g. 1:1, a fraction example 1/2, or a decimal fraction e.g. 0.96.
In this article, I want to help you set up your prints if you are not seeing perfect 1:1 results.
NOTE: Although 1:1 prints are expected to be perfectly scaled, there are a few considerations. Firstly, your printer has a driver that must communicate with your operating system. This driver will ultimately size the final print. In modern operating systems, there are no longer settings to tweak the driver’s output. So with that in mind, you may need to calibrate your printer’s output by editing the scale factor.
THINGS TO LOOK OUT FOR: The most obvious thing, is to make sure that your views are set to a scale of 1:1 on the drawing. When printing, make sure that you set the print scale to 1:1 as well.
Generally speaking, your print should work perfectly, but you may encounter some systems (combination of OS/driver & printer), where the scale is out by a small margin. The easiest thing to do in this instance is to create a calibration print.
CREATING A CALIBRATION PRINT: In my example below, I have a model with easy to measure dimensions, and views laid out on an A4 sheet at a scale of 1:1.
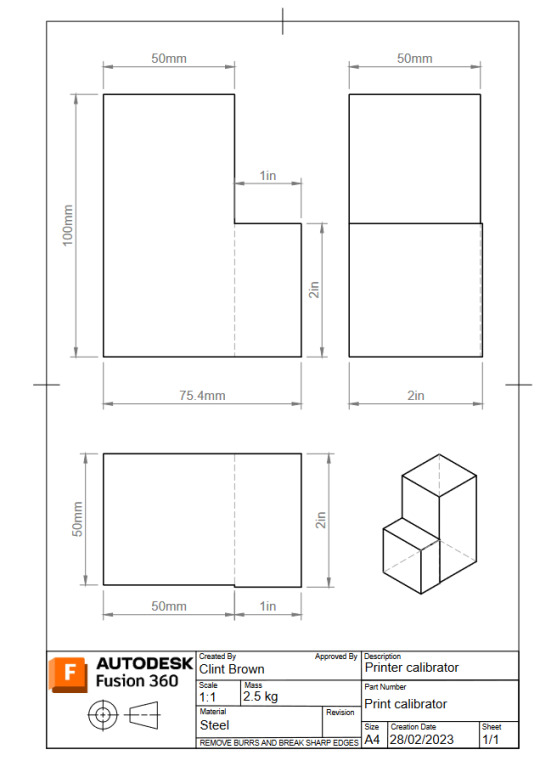
When printing this drawing out, I select the correct Printer, choose A4 paper and set the scale at 1:1

WHAT IF IT’s NOT PERFECT? Time to get out the ruler or calipers (depending on the level of accuracy you expect). For this hypothetical situation, I have created a drawing with a larger print than expected.
We are going to calculate the Scale factor needed to get the print to come out at 1:1. The first step, is to measure a known dimension.
Scale factor = expected dimension / known dimension
In the example below, my print is too big, and I am seeing a value of 110 for an expected 100 dimension. In this example, the scale would look like this:
Scale factor = 100 / 110
Scale factor = 0.9091

Inputting this new scale factor into the print dialogue will result in a perfect 1:1 print.

Above is the scale factor in the print dialogue, below is the perfectly scaled print:

OTHER CONSIDERATIONS: Following this process, you should now have a repeatable process for scaling. The scale factor should work for all prints on the same paper size. If you change paper size, you may need to go through the calibration process again.
There is always option 2 – Printing from the web.

You must be logged in to post a comment.